by can_admin | Nov 8, 2017 | Uncategorized
Software updates are never perfect, but the latest Apple iPhone 11.1 update (which added over 70 new emoji to your keyboard) also made an annoying issue for a small number of users….typing “i” auto-corrects to an “a” and a weird symbol. Apple is working on coming out with an update to correct this in the next few days, but if you’re one of the few affected, and you txt or email a lot, it is an annoying inconvenience to say the least! Here’s what you can do to fix the issue temporarily until an official fix is issued:
- Go into Settings on your iPhone
- Select General
- Select Keyboard
- Select Text Replacement
- Click “+” to add a new shortcut
- Type an upper-case “I” under “Phrase”, and type a lower-case “i” under “shortcut”
This is also a great time to look at any other words you might commonly type and want to correct. For example, I’ve set mine so that if I type “Mac” it auto-corrects to MacKenzie (my daughter), saving me some keystrokes. I’ve also done it with some frequent places or stores I shop at, and it’s a nice convenience.
If this doesn’t seem to fix your problem with the “i” issue, give us a call, we’ll be glad to take a look at it and help you out!

by can_admin | Oct 19, 2017 | Uncategorized
As of last week, nearly 50% of compatible iPhones have been updated to the new iOS 11 that was released a few weeks ago. Hopefully many of you are enjoying the new features….but more than likely you’ve noticed that since the update your battery life on your phone has significantly decreased. Sound familiar? Actually, there’s reports of this happening with any new update to a phone (iPhone or Android), so it happens to all smartphone users. We’re going to run down a few things to check with the newest iOS update…and see if we can minimize that drain with a few simple tips.
One probable cause you don’t want to discount is USER ACTIVITY when you’re checking out all those new features. You get the new software, and things look different, so you spend time logging into everything, trying apps and setting things up, and all of that drains your battery because it’s more use than normal. I know, I know….it’s not the only cause of your battery issues, but it’s definitely something to throw into the mix.
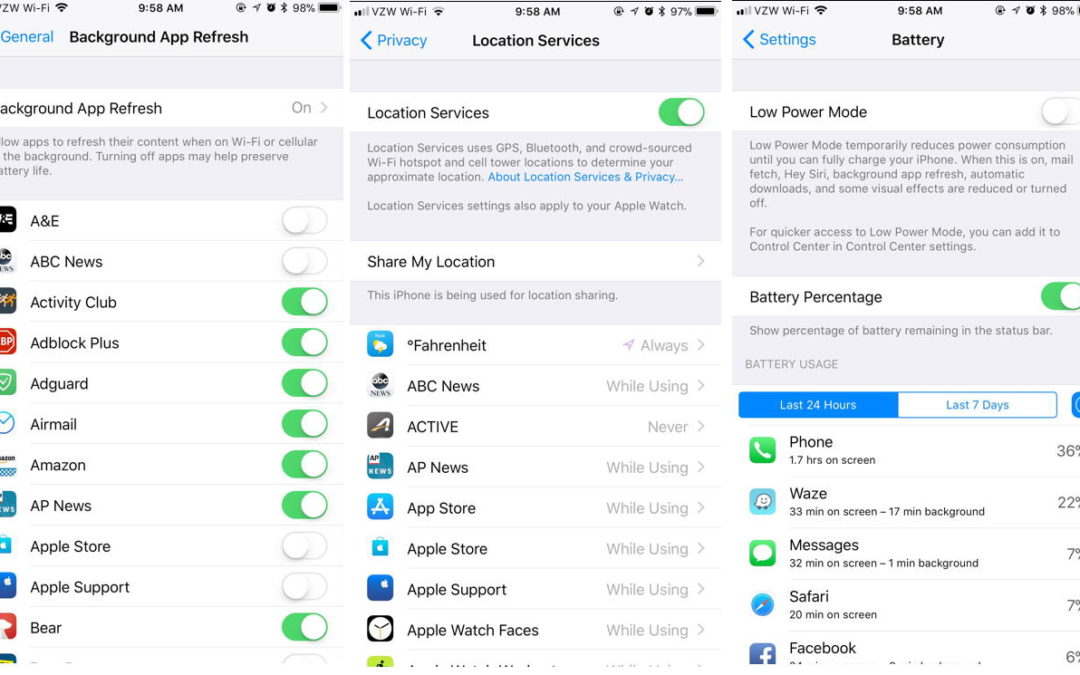
Luckily, iOS makes it easy to look at what’s hogging your battery. Go into Settings > Battery, and there’s a whole menu devoted to battery usage. See what the top apps are in both the last 24 hours, and in the last 7 days. Try uninstalling and reinstalling some of the biggest apps to see if that makes a difference (like Facebook or Instagram), as it’s possible that some apps haven’t been updated for the new operating system yet, and are inefficiently using battery. You can also get more information about an app by clicking on the biggest apps to see how much battery drain was on the screen versus in the background. If a good chunk of the battery life was spent in the background, consider disabling Background App Refresh for those apps (Settings > General > Background App Refresh).
The next thing to check is Location Services- or what’s tracking your location. Here’s where it saved me a LOT of battery life. I had several apps that were all using my location in the background all of the time. Go to Settings > Privacy > Location Services at the top. Review this list of your apps that can get your location, and consider shutting off access to many of them. Remember those popups we sometimes get when we first open an app? It will ask us if it’s ok to use the location- and sometimes we’re so anxious to just use the app we say yes to get into the program we don’t fully read what it says. Here’s how you can turn it off, and stop things from tracking where you are. (Do note….blocking location from weather or GPS apps significantly diminish their usability….so consider simply changing it from Always using your location to “While Using” if you’re unsure.
Similar to location is GPS programs. The biggest battery draining apps on the phone are almost always GPS programs. Sure, it’s convenient to use Apple Maps or Waze on your phone, but if you do it for a few hours, your battery will significantly be depleted. To help that, make sure you turn off the GPS app when you’re done using it (i.e. get to your destination, double tap the home button and find the GPS app, and swipe up to stop it from running at all). It won’t access your location in the background (if you set it to “while using” above), and will significantly save your battery life.
If you review these features, and make some changes, give it a day or two and see if things are better on your phone. I know in those first few days after updating, it was painfully draining….but now it’s significantly better. If you think you have a problem with the phone, and these tips aren’t helping it, reach out to Canyonero Consulting, and we’ll see how we can help!

by can_admin | Oct 12, 2017 | Uncategorized
Here’s a question we get all of the time: “My internet goes down a lot, or doesn’t work reliably….what can I do to fix it?” It’s a multi-leveled question, and not always an easy answer, but there’s a few factors to look at when talking about internet speed and performance:
- Check Your Speed. If you question your internet speed and performance, go to http://speedtest.net, and run a test of your internet speeds. It will tell you how fast you’re downloading and uploading, and it’s a good baseline to have these numbers before you start working to correct the problem.
- Contact Your Provider. Most people in our service area have cable based internet (from Comcast, WOW, etc), and it comes into their homes and businesses through a coax cable to a box called a cable modem. If your computer is hooked directly up to that cable modem and it’s having issues with speed or connecting to the internet, chances are that your first call needs to be your cable provider. If what’s coming into your home isn’t working, then they need to fix it, and likely there is no charge for this service. In many cases, you might just have an outdated box, and they can come bring you a new one, or they can refresh the service on their end to see if that helps. Once your internet provider has confirmed the internet coming into your home is good, then it’s time to move to the next step.
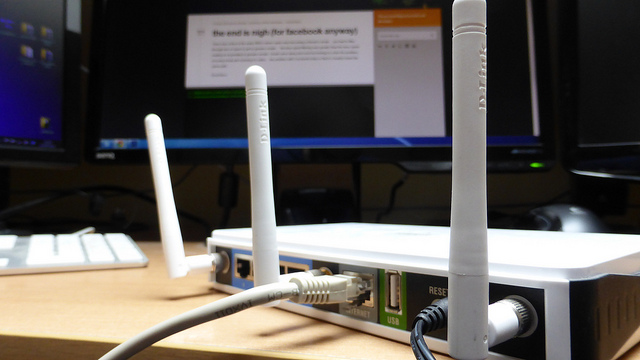
- Look At Your Router. Chances are, most of you have a wireless internet connection available at your home/office, and often times that can be the source of internet problems. By default, most of the cable internet providers will provide a combo cable modem/wireless router that they pre-configure for you when you first get the service and rent to you for around $10/month. Sometimes those combo units aren’t set up as strong as they can be, or they have a lot of interference (see below), or are simply older and need to be newer technology to connect reliably with newer devices. If you are renting your unit, see if your provider will upgrade/update your unit at no cost, or consider having Canyonero come out to put a higher quality external wireless router in your home. Purchasing your own wireless routers can be an inexpensive yet significant performance upgrade to the standard rented equipment. They make hundreds of different boosters and routers out there, so it’s a good idea to get professional advice before buying something new. We can also purchase a cable modem, which will allow you to forego that monthly rental fee all-together and get you newer, more reliable equipment!
- Location, Location, Location! Having a good central location on your wireless router is key in getting internet in your home. Is the wireless router located in an area with a lot of interference from other electronic devices, metals, stones or brick walls? Lots of times, the wireless signal can be affected by both walls and hard structures as well as electronic interference from things like your cordless telephone or microwave oven. Try moving the wireless router to the most central location in your home, or away from other electronics and see if that helps the speed and stability of your service. In some cases, you may need a wireless extender or 2 wireless routers if your square footage is too large or oblong for a standard wireless signal.
If you can identify where the performance problems are coming from, that’s usually the first step in the process. In many cases, a phone call to your provider can help address or identify problems, but if not, there are many things we can try to help boost the performance, speed, and reliability of your internet service.


by can_admin | Sep 29, 2017 | Uncategorized
The majority of our customers are iPhone users, and every so often I get an inquiry from a customer who has run into a problem with their phone, and the first question I ask is “when was your last backup”. If in hearing that question, you don’t know the answer…keep reading, and you’ll want to follow the steps I detail below.
iPhones have a great cloud backup feature- iCloud- which is built into their phones making it easy to back up seamlessly….IF you have it set up properly before hand. We’re going to walk through how to make sure it’s set up correctly, and if it’s not, help you make sure it.
- Know your iCloud username/password? This is perhaps one of the most important steps in the whole process. If you’re a user of Apple products, and have at least one device (iPhone, iPad, etc.), you’ll want to have one username that is your iCloud username/password. This is your account for everything Apple….it’s what your backups are tied to, it’s what your app store purchases are tied to, and it’s your personal account for everything on your phone. You can check your phone right now and see what yours is: go to Settings > click your name at the top (if that doesn’t work, you have an older operating system…so you go to Settings > iCloud). You should see an email address at the top of the screen. This is your AppleID…and while it’s logged in, any backups or purchases that are made are tied to this account. Make sure you know the password to this account…assuming it’s already logged in, scroll to the bottom of the iCloud screen and click Sign Out. You will be prompted to type in your password….if it lets you log out, you have the correct password (so now log back in with that password). Write both that username and password combination down in a safe place. Most importantly….parents, make sure you have this for your kids devices as well. It is critical to have this information if you ever need to recover the data on your phone.
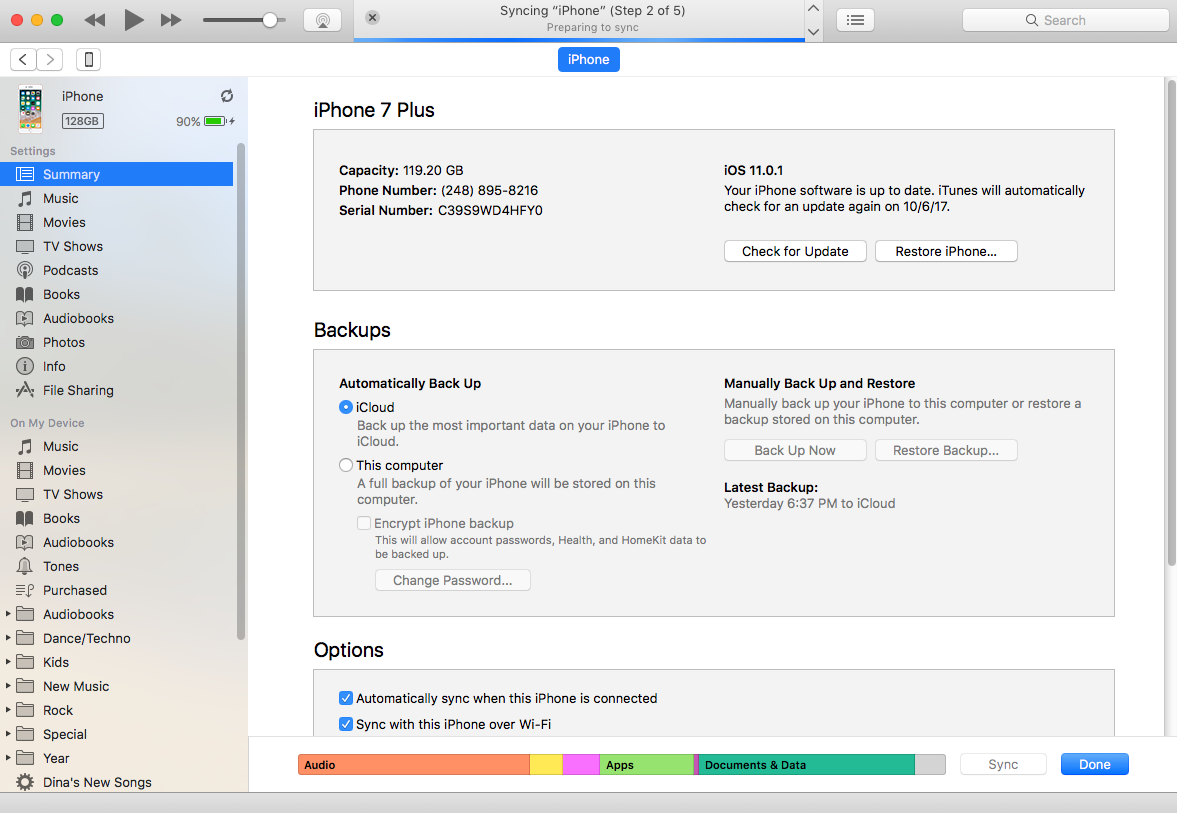
- Check the Backup Status. There are two ways to backup your Apple device….one is via iCloud (storing it electronically in the cloud), and the other is by plugging the device into your computer and storing the backup on your computer. The key is to make sure at least one, if not both are working. We’ll detail how to check both ways:
- iCloud (preferred method): Head to Settings > click on Your Name > and then click on iCloud. Scroll down on the screen to where it says iCloud Backup. Note what it says next to that option….if it says “On”, it means you’re currently making a backup. Click on that setting to see the details about it; once it’s set up correctly, the phone will automatically backup its information to the cloud when the device is plugged in, locked, and connected to WiFi (for example, when you plug the phone in to charge it for the night). If the setting is on, note the last successful backup. If you lost your phone right now, would you be OK with restoring your phone to what it looked like at that date/time? If not, do a Back Up Now to get a more recent backup. We recommend turning this on, and check it the next few days to insure it is properly doing a backup nightly.
- iTunes: Plug the device into the computer, and open your iTunes program. In the upper left side of the screen, you should see a small icon of a iPhone or iPad….click on that to verify you’re looking at the right device. In the center of the screen, note the backup section, and see when your last Backup was. While you’re here, it’s not a bad idea to do a manual backup to your computer right now via iTunes, just to have it. While the phone is plugged in, click the “Back Up Now” button on the screen, and the device will manually back up to the computer as well.

- Figuring out the iCloud Storage Space. Here’s one that gets many of our clients…they know their AppleID/password, they have the device backing up on a regular basis, but they take a lot of pictures, and they can’t complete an iCloud backup because they’re out of space. iCloud gives everyone 5GB of free backup space in the cloud….but that quickly gets used if you store a lot of data or take a lot of pictures. If you’ve hit that limit, consider paying for more storage. Apple has very reasonable pricing for storage (https://support.apple.com/en-us/HT201238), 50GB is 99 cents/month, and WELL worth the money for the simplicity of automatic backups alone. If 50GB isn’t enough, consider the 200GB backup option for $2.99/month. Best of all, now in iOS 11, your paid backup storage can be shared between other devices in the family….so if you spring for the $36/year for the 200GB storage option- it can be shared with your spouse and kids as well…making it a wonderful investment. I know….nobody likes another monthly payment….but I can tell you from experience, the simplicity of having the backup done automatically in the cloud nightly for the convenience of $36/year as opposed to having to remember to manually do it to your computer….it’s a no brainer…especially if the device is lost or stolen and you are now relying on your last backup to get back those baby pictures and vacation videos.
Now that you’ve checked your device’s backup status, breathe a sigh of relief….make sure you’ve documented the username and password, and make sure you know how it’s backing up on a regular basis. If you choose to do the manual backups, consider creating a reminder to make you remember to do them on a regular basis. It’s amazing how we rely on these devices now a days, and if you make sure it is set up correctly from the start, you’ll minimize problems later down the road. As always….if you need help with this….don’t hesitate to reach out and ask your friendly Canyonero Tech!
by can_admin | Sep 14, 2017 | Uncategorized
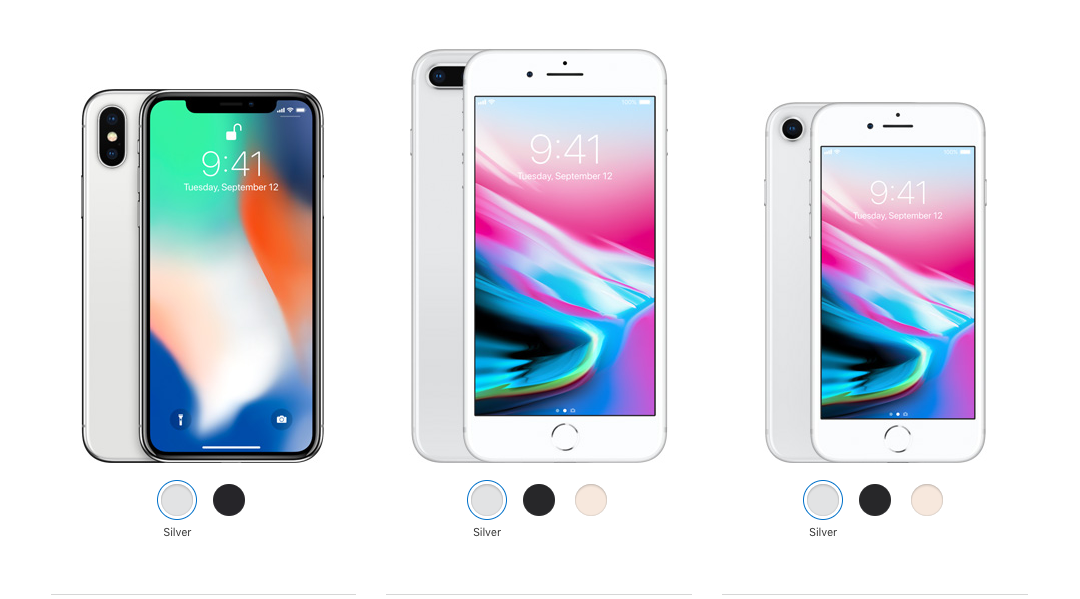
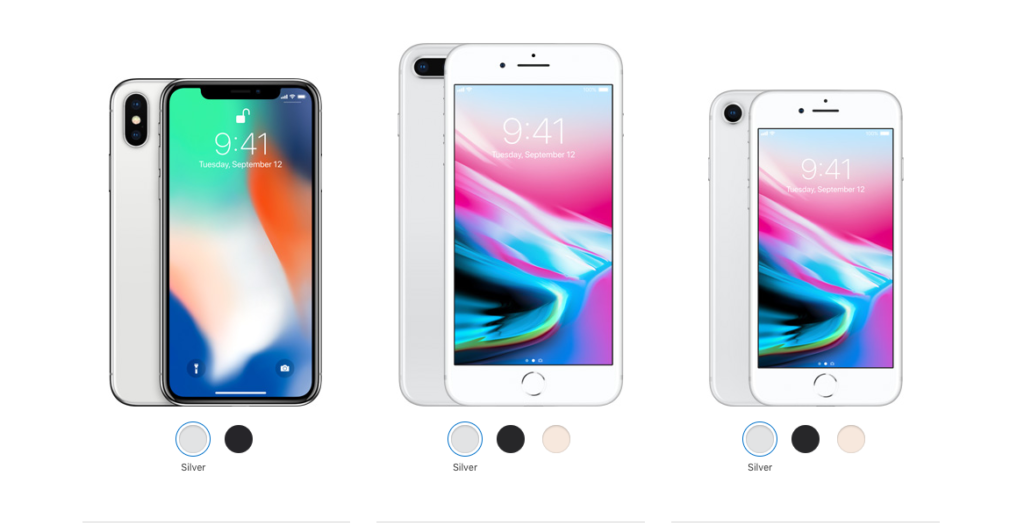
Earlier this week, Apple confirmed the widely speculated reports about their new phone lineup, offering two new more traditional phone called the iPhone 8 and iPhone 8+, and the next-generation iPhone X. All of the new models boast great new technology, and it’s made many of our customers already green with envy for those new models. However, before biting the bullet and springing for one of the new phones, here’s a few things you should consider first:
- Consider Last Year’s Model: A lot of the press has been around the new iPhone X which boasts the $1,000 price tag, and makes it out of most people’s budgets. However, you don’t necessarily need the latest & greatest phone in any brand to get a good upgrade. With the addition of these new phones released this week, Apple actually offers 5 different models of the popular iPhone. If you have a dying iPhone 4 or iPhone 5, you’re probably going to be just as happy with an iPhone 6 or iPhone 7, and can pocket the money savings!
- Don’t Skimp On Storage! If you take pictures with your phone, chances are that space on your phone is a premium. If your current device has 16GB or 32GB of storage space, it’s on the small size, and will quickly become out of space with a lot of media or pictures. Our advice: buy the biggest amount of storage space you can afford. You can’t add more later, so the best thing to do is make sure it’s big enough for your needs from the beginning.
- Backup Your Phone & Pictures: Hopefully you’re already doing this, but if not, please make sure you have either a backup in the cloud or a local backup on your machine of all of your data, contacts, pictures, media, etc. In most cases, once you have that data, you can simply restore it all to the new phone, making your transition to the new device much easier. Before you get rid of the old one, back it up!
- Sell Your Old Device: These smartphones are expensive….too expensive to leave sitting in a drawer once you’re done with it. Once you’ve gotten your data off, consider selling it. Sites like Craigslist, Ebay, and even Facebook Swap Sites are hotbeds for old phones, and usually give a good payout, if you’re familiar with online selling. If not, consider selling your phone back to Apple, or Amazon– both of which pay top dollar for these older used devices with minimal disruption on your end. There are also many 3rd party sites, like Gazelle, which are also worth checking to see who will pay you the most for your old phone. Whatever you do….make sure your data is off the machine….and Canyonero can help with that.
- Check Your Cell Phone Plan: It goes without saying, but make sure you’ve done your homework before you get too excited about upgrading. Contact your current carrier and make sure you have an available upgrade, and make sure that by getting your new phone you’re not unwillingly increasing your contract, or making some other costly change. Check to see if your eligible for any plan changes- like moving to a family plan- or if your employer offers a discount. If you have them on the phone, it never hurts to ask if they can make the bill cheaper by moving you to another plan. Lastly, consider switching carriers to get a bigger savings. Many carriers will offer to help pay the early-termination fee if you switch to their company, making it a good way to save money if you’re willing to switch.

by can_admin | Sep 7, 2017 | Uncategorized
Many of you have heard that the popular online backup software CrashPlan recently ceased their personal service offerings, leaving customers in a scramble to find a new service, or rethink their whole backup process. Online backups have become more popular in the last few years because of their low price point, ease of use, and reliability- and for that, it’s usually what we first recommend to customers. Sure, having a physical backup hard drive in your possession is great, but it does nothing if you fail to actually plug it in and make sure that it’s correctly backing up your data. Another nice perk of online backups is that they can often be set to keep daily or hourly backups of files changed since the last backup, so you always have something to roll back to if needed. So, having pointed out the need for a good, easy to use backup system, in the wake of CrashPlan’s demise…here’s a few of the more popular plans to consider:
- Carbonite. Perhaps one of the more trusted names in online backups for both personal and business accounts. Plans for personal accounts start at $60/computer/year for unlimited hard drive space, and their software is easy to install and easy to verify that it’s working correctly.
- IDrive. Similar to Carbonite, IDrive is another competing solution. Instead of offering unlimited space in their cheapest option, they limit it to 2TB, but their backup software has proven to be more efficient and quicker than other competitors.
- Backblaze– Backblaze is our favorite of the pack, and one of the simplest and easiest to use. At $5/computer/month it’s easy, affordable, to make sure everything it backing up to the cloud all of the time. In the event of a computer failure or theft, your IT company will thank you because restoring from a backup is easy and timely.
- Local Options– If you’re not one for using the big guys, consider utilizing a local provider for computer backups. Our favorite in the Metro Detroit area is Sector 7 LLC. They offer several different packages for both personal and small businesses needing backups, but can price out a comparable solution tailored to your needs by contacting their sales team.
Whether you’re looking to backup your whole computer, or just have a single folder of your music, pictures, and media backed up to the cloud, there is simply no excuse for not having a secure backup within reach. Need help deciding what’s right for you? Fear not, and call Canyonero Consulting with your questions….we’re here to help!