

The majority of our customers are iPhone users, and every so often I get an inquiry from a customer who has run into a problem with their phone, and the first question I ask is “when was your last backup”. If in hearing that question, you don’t know the answer…keep reading, and you’ll want to follow the steps I detail below.
iPhones have a great cloud backup feature- iCloud- which is built into their phones making it easy to back up seamlessly….IF you have it set up properly before hand. We’re going to walk through how to make sure it’s set up correctly, and if it’s not, help you make sure it.
- Know your iCloud username/password? This is perhaps one of the most important steps in the whole process. If you’re a user of Apple products, and have at least one device (iPhone, iPad, etc.), you’ll want to have one username that is your iCloud username/password. This is your account for everything Apple….it’s what your backups are tied to, it’s what your app store purchases are tied to, and it’s your personal account for everything on your phone. You can check your phone right now and see what yours is: go to Settings > click your name at the top (if that doesn’t work, you have an older operating system…so you go to Settings > iCloud). You should see an email address at the top of the screen. This is your AppleID…and while it’s logged in, any backups or purchases that are made are tied to this account. Make sure you know the password to this account…assuming it’s already logged in, scroll to the bottom of the iCloud screen and click Sign Out. You will be prompted to type in your password….if it lets you log out, you have the correct password (so now log back in with that password). Write both that username and password combination down in a safe place. Most importantly….parents, make sure you have this for your kids devices as well. It is critical to have this information if you ever need to recover the data on your phone.
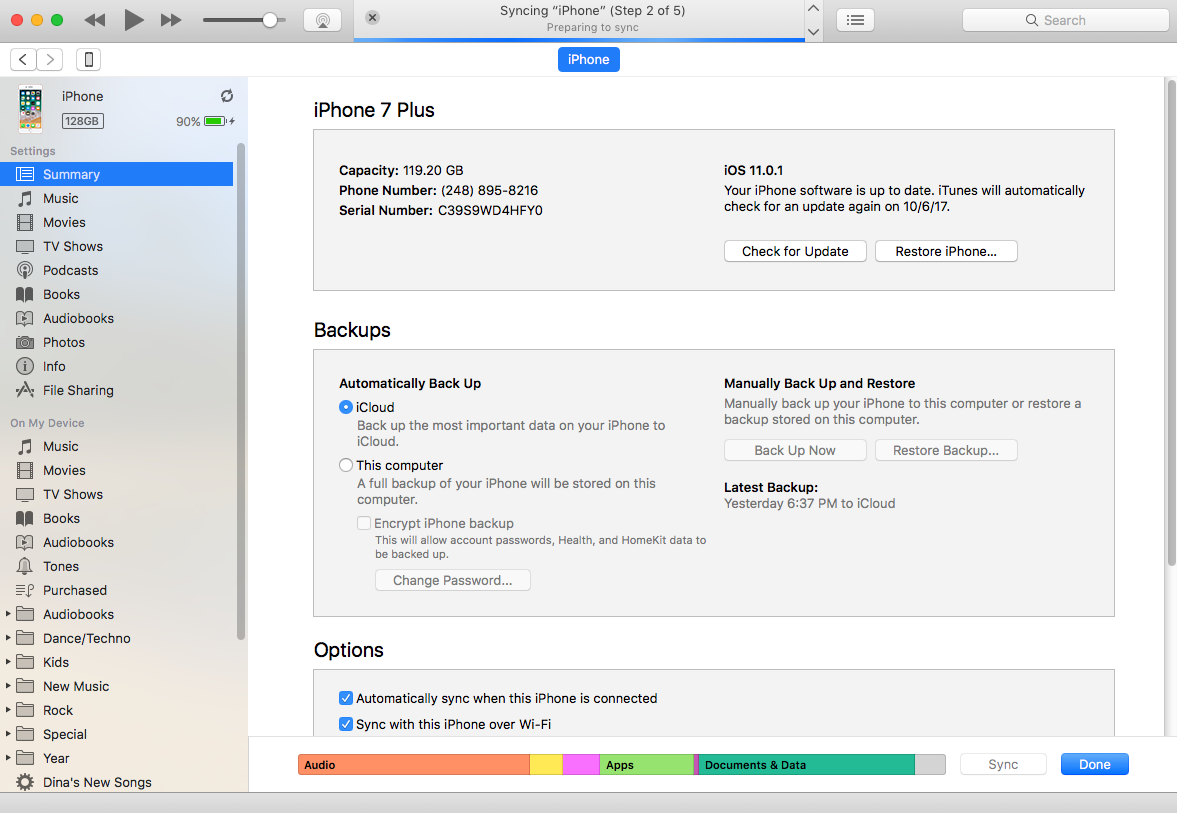
- Check the Backup Status. There are two ways to backup your Apple device….one is via iCloud (storing it electronically in the cloud), and the other is by plugging the device into your computer and storing the backup on your computer. The key is to make sure at least one, if not both are working. We’ll detail how to check both ways:
- iCloud (preferred method): Head to Settings > click on Your Name > and then click on iCloud. Scroll down on the screen to where it says iCloud Backup. Note what it says next to that option….if it says “On”, it means you’re currently making a backup. Click on that setting to see the details about it; once it’s set up correctly, the phone will automatically backup its information to the cloud when the device is plugged in, locked, and connected to WiFi (for example, when you plug the phone in to charge it for the night). If the setting is on, note the last successful backup. If you lost your phone right now, would you be OK with restoring your phone to what it looked like at that date/time? If not, do a Back Up Now to get a more recent backup. We recommend turning this on, and check it the next few days to insure it is properly doing a backup nightly.
- iTunes: Plug the device into the computer, and open your iTunes program. In the upper left side of the screen, you should see a small icon of a iPhone or iPad….click on that to verify you’re looking at the right device. In the center of the screen, note the backup section, and see when your last Backup was. While you’re here, it’s not a bad idea to do a manual backup to your computer right now via iTunes, just to have it. While the phone is plugged in, click the “Back Up Now” button on the screen, and the device will manually back up to the computer as well.

- Figuring out the iCloud Storage Space. Here’s one that gets many of our clients…they know their AppleID/password, they have the device backing up on a regular basis, but they take a lot of pictures, and they can’t complete an iCloud backup because they’re out of space. iCloud gives everyone 5GB of free backup space in the cloud….but that quickly gets used if you store a lot of data or take a lot of pictures. If you’ve hit that limit, consider paying for more storage. Apple has very reasonable pricing for storage (https://support.apple.com/en-us/HT201238), 50GB is 99 cents/month, and WELL worth the money for the simplicity of automatic backups alone. If 50GB isn’t enough, consider the 200GB backup option for $2.99/month. Best of all, now in iOS 11, your paid backup storage can be shared between other devices in the family….so if you spring for the $36/year for the 200GB storage option- it can be shared with your spouse and kids as well…making it a wonderful investment. I know….nobody likes another monthly payment….but I can tell you from experience, the simplicity of having the backup done automatically in the cloud nightly for the convenience of $36/year as opposed to having to remember to manually do it to your computer….it’s a no brainer…especially if the device is lost or stolen and you are now relying on your last backup to get back those baby pictures and vacation videos.
Now that you’ve checked your device’s backup status, breathe a sigh of relief….make sure you’ve documented the username and password, and make sure you know how it’s backing up on a regular basis. If you choose to do the manual backups, consider creating a reminder to make you remember to do them on a regular basis. It’s amazing how we rely on these devices now a days, and if you make sure it is set up correctly from the start, you’ll minimize problems later down the road. As always….if you need help with this….don’t hesitate to reach out and ask your friendly Canyonero Tech!
 Canyonero Consulting